How to program your mimcook
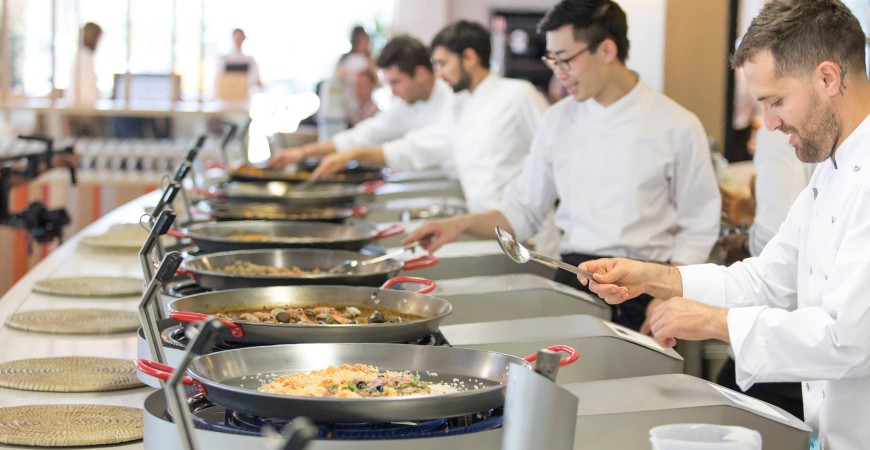
With the arrival of the Mimcook paellera burner robot and its Go version in our store, we are happy to announce that any cook can make a delicious paella with the same knowledge as the first time, as many times as they wish, with the simple act of following the steps of the recipe offered by this robot for paella pans.
The paella burner robot comes with multiple recipes by default, delicious and worthy of serving our diners, but our cooks and chefs can also include their own recipes in the paellera burner robot, facilitating its preparation and allowing us to produce high-class rice dishes while we focus on other kitchen chores.
This process, due to the word "programming", may sound alarming and heavy work, a task that will take us several hours, but it is extremely simple, since it is a simple excel document customized for the robot for paella pans.
We have already programmed some of our own recipes in our paellera burner robot, and that is why we bring you this guide, so that you know not only the levels of customization that you can include in your recipes, but also how to prepare them perfectly for use in your own intelligent robot for paellas.
The menu of recipes and options
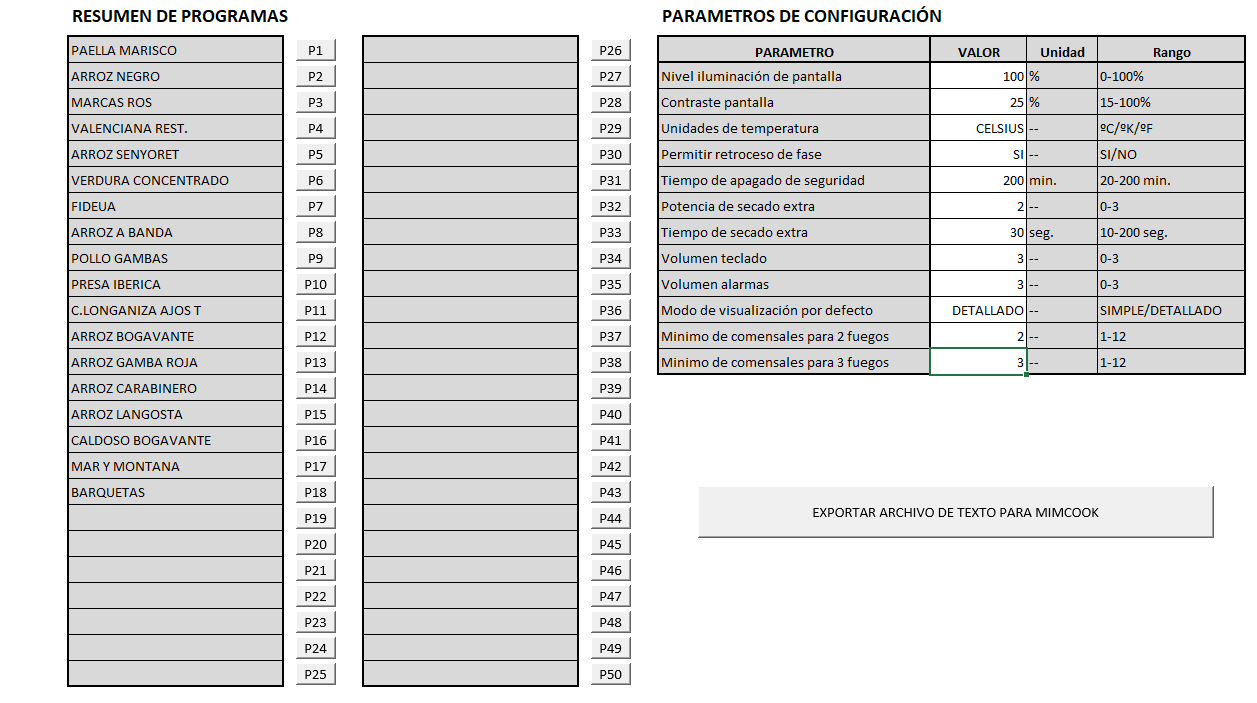
First of all, you will need to open your Excel recipe programming file that came with your Mimcook. On the first page you have two sections: The list of 50 recipes and the general options of the paellera burner robot.
As standard, your paella burner robot comes with 15 preprogrammed recipes, which leaves us 35 spaces for our own recipes, as long as we don't want to delete the ones that come by default.
We can access them from the buttons located on their sides, or by selecting them from their page at the bottom of the excel file.
On the right of this page, we have the general options, through these parameters we can modify the characteristics of our paellera burner robot, from what type of units it should indicate the temperature in, to whether we allow us to go back between steps of our recipes, the box also informs us of the range of our options.
If we select any recipe option, we will be shown 2 boxes, the first one allows us to program the steps of our recipe, while further to the right we have the box of ingredients and amounts per diner. Below the boxes we find the possible error codes, which automatically inform us if some of the information in our recipe is not filled in correctly.
Let's focus first on the schedule box.
Introducing our recipes for our intelligent burner robot
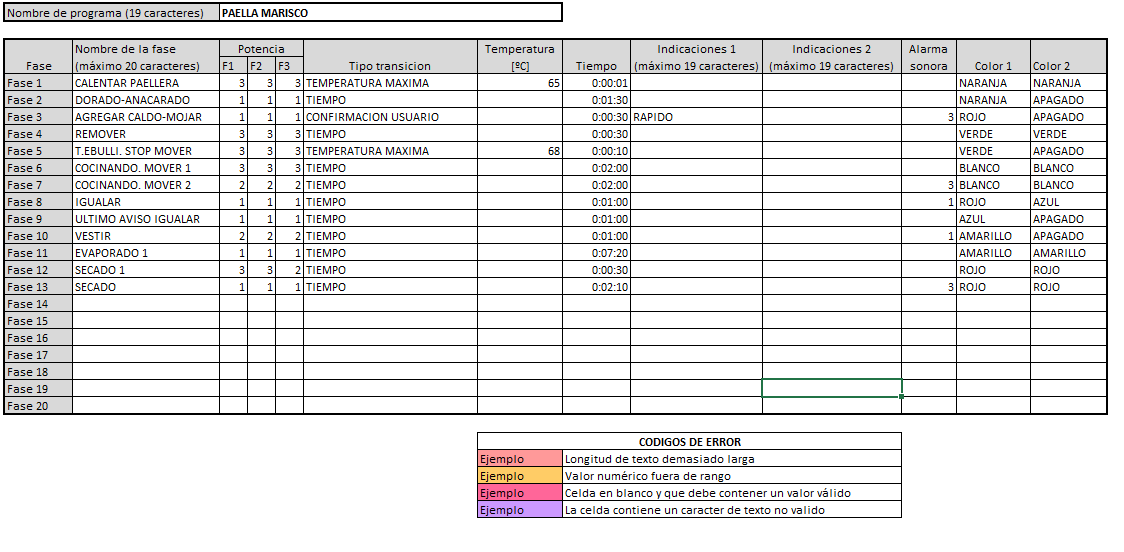
This chart governs the steps we have to follow and how they are reported to our cook. You have a maximum of 20 steps or phases, where we can customize what appears on the screen of our paella robot up to a maximum of 20 characters, thus informing what we must do or what step our recipe is in.
Each phase has a certain power on a scale from 1 to 3, this power will determine the strength with which the fire will be automatically regulated in our recipe.
Following this, we can determine how that phase of our recipe should change step by step, we can tell it to do so when it reaches a maximum temperature, through a certain amount of time or if it will require the user to manually tell the paellero robot move on to the next step of our recipe. The variables of these options can be manipulated through the temperature and time boxes that they have on their right side.
With our scheduled phases, we can also include extra prompts that will appear on the screen below the phase. This can help us to add reminders or notices to our cooks.
Another interesting option is the ability to include an audible alarm at specific phases of the recipe. The audible alarm can be set to a beep scale of 1 to 3 repetitions.
In this way, we can let the steps that do not require our attention run their course and only alert the cook of steps that really require their attention, such as adding more ingredients or stirring the rice.
Finally, we can also customize the colors of the letters of our notices. For those who are used to memorizing with colors, separating the different phases with colors can be a good visual way to let our cooks know what to do even without the need to read the text, yellow to let it cook, green to add ingredients , blue to remove.
Ingredients and amounts
With our programmed recipe, now we have to indicate what ingredients we need and the necessary quantities according to the number of diners who want to enjoy our recipe.
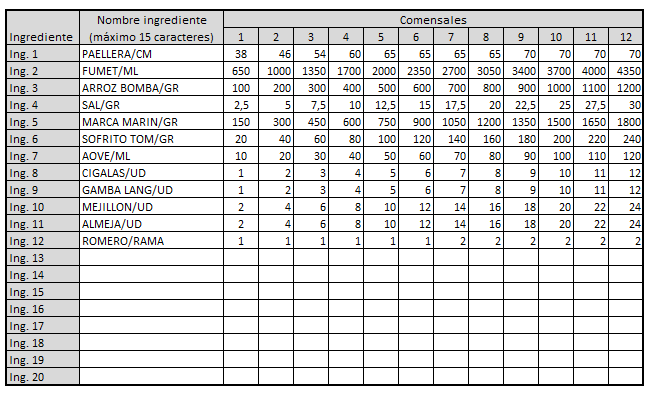
To the right of our phase chart, we have the ingredients and diners chart. This is where we indicate what ingredients this recipe uses and the amounts we need according to how many diners. We have space for up to 20 ingredients, with variations from 1 to 12 diners for our recipe.
When we request our recipe in the smart paellero, according to the number of diners that we indicate, it will provide us not only with the ingredients, but also with the amount necessary for that number of diners.
With the ingredients of the recipe ready and the steps to follow prepared, now we only have to export our recipes and include them in our paellero robot.
Export and import your recipes
Exporting our recipes is extremely simple, on the main page, select the export button and the Excel file will be exported to your download folder.
Include this export in a USB, insert the USB into the port of your paellero robot and select the import option on the screen.
Give it a few seconds to import, when it's done, look at the recipes of your paellero robot and that's it, all your original recipes will now be included in your paella robot.

